Tortoiseshell Nails: Colour, Placement and Salon Reference Ideas
Plan a tortoiseshell manicure through colour, pattern scale and placement, with practical notes for a salon consultation.
Archive edition: 2026-07-25 · This is an editorial allocation, not the first-publication date.
Key takeaways
- Warmth: choose golden amber, caramel or a muted brown direction.
- Depth: decide how much lighter space should remain visible.
- Scale: compare patches on a sample close to your nail length.
- Placement: agree accents, tips or a full patterned set.
In this guide
- Key takeaways
- Look for three parts of the pattern
- Understand what a reference can and cannot specify
- Choose the amount of pattern
- Adjust the scale to your nails
- Decide whether extra decoration helps
- Build a clear tortoiseshell reference
- Give the artist priorities, not a rigid copy request
- Common questions
- Sources and further reading
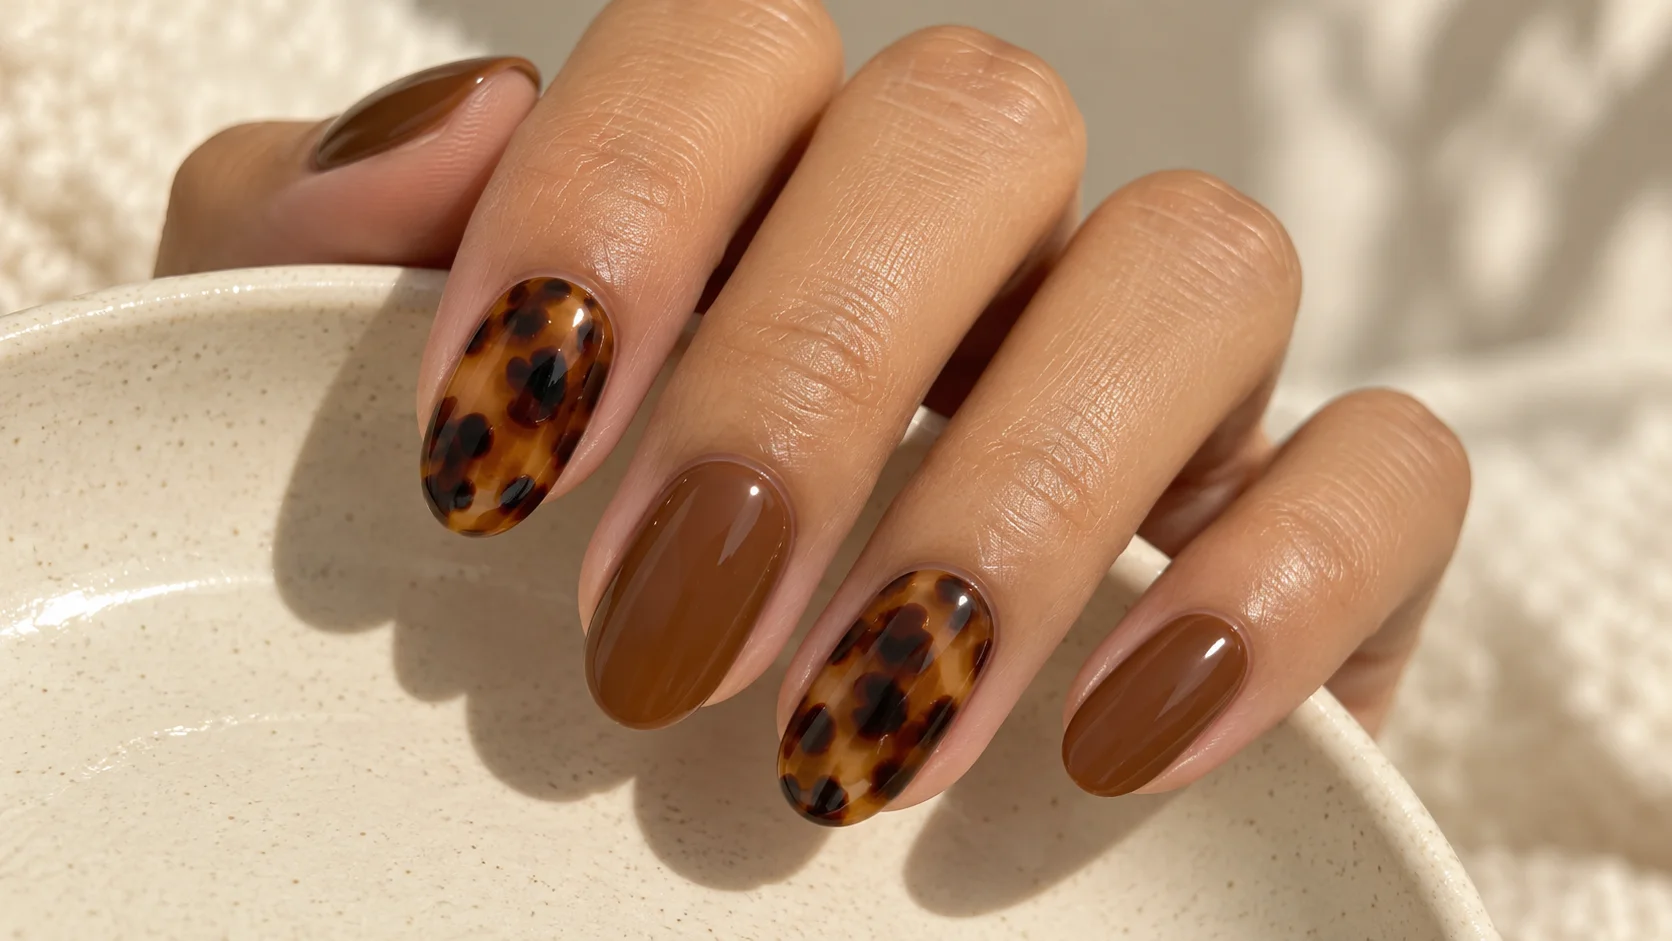
Tortoiseshell nails are a painted pattern built from warm amber or caramel areas and irregular darker marks. The attraction is the uneven depth: some areas look light and open, while others appear richer and more layered. A useful salon reference shows that balance, rather than simply asking for brown spots on every nail.
You can choose the pattern for a full set, a few accent nails or a coloured tip. Start by deciding how much pattern you want to see, then choose the warmth, darkness and scale. This guide focuses on describing the design. The professional examples cited use particular gel systems; they are not a universal home application recipe.
Look for three parts of the pattern
The first part is the background colour. Amber gives a golden starting point, caramel can look softer and milkier, and a muted brown creates a quieter direction. A translucent background can leave the darker marks looking suspended in colour. A more opaque base changes that effect, so include coverage in your description as well as the shade.
The second part is the dark pattern. Look for irregular patches that vary in size, spacing and density. A set of identical round dots makes a different design statement. If your reference feels too busy, it may be because the marks are tightly packed, not because the brown itself is too dark.
The third part is the lighter space between those marks. Preserving some amber areas lets the pattern remain readable. An almost fully dark nail may be beautiful, but it will communicate a different balance. Explain whether you want a light amber manicure with dark detail or a deep brown manicure with glimpses of warmth.
Understand what a reference can and cannot specify
Professional examples show different routes to this appearance. Mylee’s Tortie quad combines specified colours with a blooming gel. A Scratch demonstration by educator Natasha Sebastianelli includes a translucent brown layer. These examples support the importance of colour and depth, without making either method a requirement for every service.
Nail Order’s own demonstration uses a warm translucent base and irregular darker patches, with further depth and decoration as optional elements. Take the visual choices to your technician and let them explain their compatible products and process. Product combinations, layer thickness and curing directions belong to the particular system being used.
A photograph cannot tell you exactly which products created the look. It also may not reveal filters, lighting or the thickness of the finished service. Bring the reference as a conversation starter and identify what you like about it: golden warmth, open spacing, dark edges or a soft, blurred pattern.
Choose the amount of pattern
One or two accent nails are a practical starting point when you want to compare the pattern against a plain colour. Repeat one of the design’s own colours on the remaining nails, such as caramel or chocolate. This makes the relationship easy to describe and leaves the patterned nails as the main detail.
A full patterned set can still be restrained if the colour palette and scale stay consistent. Consistent does not mean identical: the patches can vary while sharing a similar amount of light space. Ask to see a complete-hand reference so you can judge the rhythm across all the nails, rather than selecting a single striking close-up.
Tortoiseshell tips use a smaller area, so they need a separate conversation about scale. A tiny tip may show only one or two colour changes. If the reference has broad tips on long nails, ask whether its layered effect can remain visible at your preferred length. You can preserve the warm palette without copying every mark.
| Placement | Visual emphasis | Useful consultation detail |
|---|---|---|
| One accent per hand | A small focal point beside plain colour | Choose the same accent position or a deliberate asymmetry |
| Two accents per hand | More pattern with space between it | Agree how the two patterned nails relate |
| Full set | Pattern becomes the complete colour story | Specify similar density without demanding identical patches |
| French tips | Warm detail concentrated at the edge | Check readability at the actual tip width |
Adjust the scale to your nails
Short nails do not need to imitate a long reference at the same scale. A few smaller, uneven patches with clear spaces can communicate the idea without filling every corner. Ask for a sample or a sketch of the intended distribution if you find it difficult to imagine the pattern on your own nail width.
Wider nails may carry a different arrangement from narrower ones. The goal can be a similar overall impression rather than a fixed number of marks on every finger. Decide whether you like scattered islands of dark colour, softer cloud-like areas or a few stronger patches near the edges.
Shape also changes the frame around the pattern. A softly square edge provides a different outline from an oval tip. Choose the shape you want to wear, then adapt the pattern within it. There is no need to choose a longer nail simply because most of your saved photographs show one.
Decide whether extra decoration helps
A fine metallic detail or a small area of foil can be an optional accent, but neither is needed to make the pattern recognisable. Compare the reference with and without that extra element. If your favourite feature is the warm translucent depth, too many additional focal points may move attention elsewhere.
Plain companion nails can vary in depth without introducing a new colour family. A caramel companion gives a lighter overall set; chocolate creates a darker one. Check a sample of the plain colour beside the pattern before committing. A name such as “brown” is too broad to communicate the relationship on its own.
Build a clear tortoiseshell reference
- Warmth: choose golden amber, caramel or a muted brown direction.
- Depth: decide how much lighter space should remain visible.
- Scale: compare patches on a sample close to your nail length.
- Placement: agree accents, tips or a full patterned set.
Give the artist priorities, not a rigid copy request
A clear brief could be: “Short oval nails, two light amber tortoiseshell accents on each hand, irregular dark chocolate patches with visible space between them, and caramel on the remaining nails.” Add whether you want a glossy or alternative finish, then ask the technician to show how that finish affects the layered appearance.
Confirm the service type, design time and price before work begins. Ask for care and removal instructions for that exact manicure. Save a photograph and the main colour details afterwards, but allow for natural variation when a hand-painted pattern is repeated. If you want a change next time, describe the specific adjustment: less darkness, smaller patches or fewer accent nails.
For the related design decisions, compare Mocha Nails: Choosing Chocolate, Taupe and Coffee Tones, Colour Block Nails: Simple Layouts for Two or Three Shades and How to Build a Nail Inspiration Board Your Technician Can Use. For the practical details, use Regular Nail Polish vs Gel-Like Polish: What the Labels Mean.
Common questions
What makes nail art look like tortoiseshell?
The painted effect combines a warm background, irregular darker patches and lighter spaces that remain visible between them. Translucent-looking depth can be part of the design. Identical dots or a nearly solid dark surface create a different balance, so show the spacing you prefer.
Do tortoiseshell nails have to use gel?
The references discussed here include specific professional gel systems, but the visual name alone does not define a required service. Ask your provider which format they offer and request a sample. Do not assume a photograph reveals the products or application method used.
Can the pattern work on short nails?
A technician can discuss a smaller-scale version with fewer or more compact patches. Compare a reference near your intended length and preserve enough lighter space for the design to remain readable. Copying the exact number of marks from a long nail is unnecessary.
Is one accent nail enough?
One accent on each hand can provide a clear focal point beside plain caramel or chocolate nails. Decide whether the positions should match or be deliberately different. Compare the companion colour against the pattern so the overall set feels connected to your chosen palette.
What should I ask for if a reference looks too dark?
Ask for more visible amber space, fewer dark patches or a lighter background, depending on what you dislike. These changes are more specific than requesting a softer pattern. Compare the revised idea before adding decorative details that could make the design busier again.
Can tortoiseshell be used just on the tips?
It can be discussed as a French-tip design, but the available area changes how much pattern is visible. Ask to see the proposed scale at your actual length and tip width. A very narrow band may suggest the palette without showing extensive layered detail.
Are metallic accents necessary?
No, the warm-and-dark pattern can stand on its own. Metallic detail is an optional design choice rather than a defining requirement. Compare a plain version first, then decide whether a small accent adds something you want without competing with the layered colour.
Will every nail or repeat appointment look identical?
A hand-painted irregular pattern can vary while keeping the same colour balance, scale and overall density. Save those priorities with a photograph of the finished set. If you want a closer repeat, discuss which details matter most instead of expecting every patch to be identical.
Sources and further reading
- Mylee — Tortie Gel Polish Quad — checked 2026-10-21
- Scratch — Tortoiseshell nail tutorial by Natasha Sebastianelli — checked 2026-10-21
- Nail Order — How to create simple tortoiseshell nails — checked 2026-10-21