Minimal Floral Nail Art: Small Details and Balanced Placement
Choose one flower, set its scale and leave enough open space for a small floral detail to read clearly.
Archive edition: 2026-07-03 · This is an editorial allocation, not the first-publication date.
Key takeaways
- Choose the flower’s size and position before adding more colours or motifs.
- A single accent nail can carry a complete floral idea.
- Leave enough space between painted marks for the petals to remain readable.
- A crisp dotted flower and an intentionally blurred wet design need different planning.
In this guide
- Key takeaways
- Choose a motif that survives being small
- Set the flower’s footprint
- Keep the first palette small
- Distinguish crisp petals from a wet, organic effect
- Practise the spacing, then the whole flower
- Build one readable floral accent
- Let the other nails support the accent
- Adapt the reference to your skill and time
- Common questions
- Sources and further reading
Minimal floral nail art works through selective detail. One small daisy on a quiet base can communicate the idea without a flower on every finger, a trail of leaves or a second decorative border. The challenge is less about drawing a realistic plant and more about placing a recognisable shape on a small curved surface. A simple plan helps you keep the flower clear as the design moves from a saved picture to your own nails.
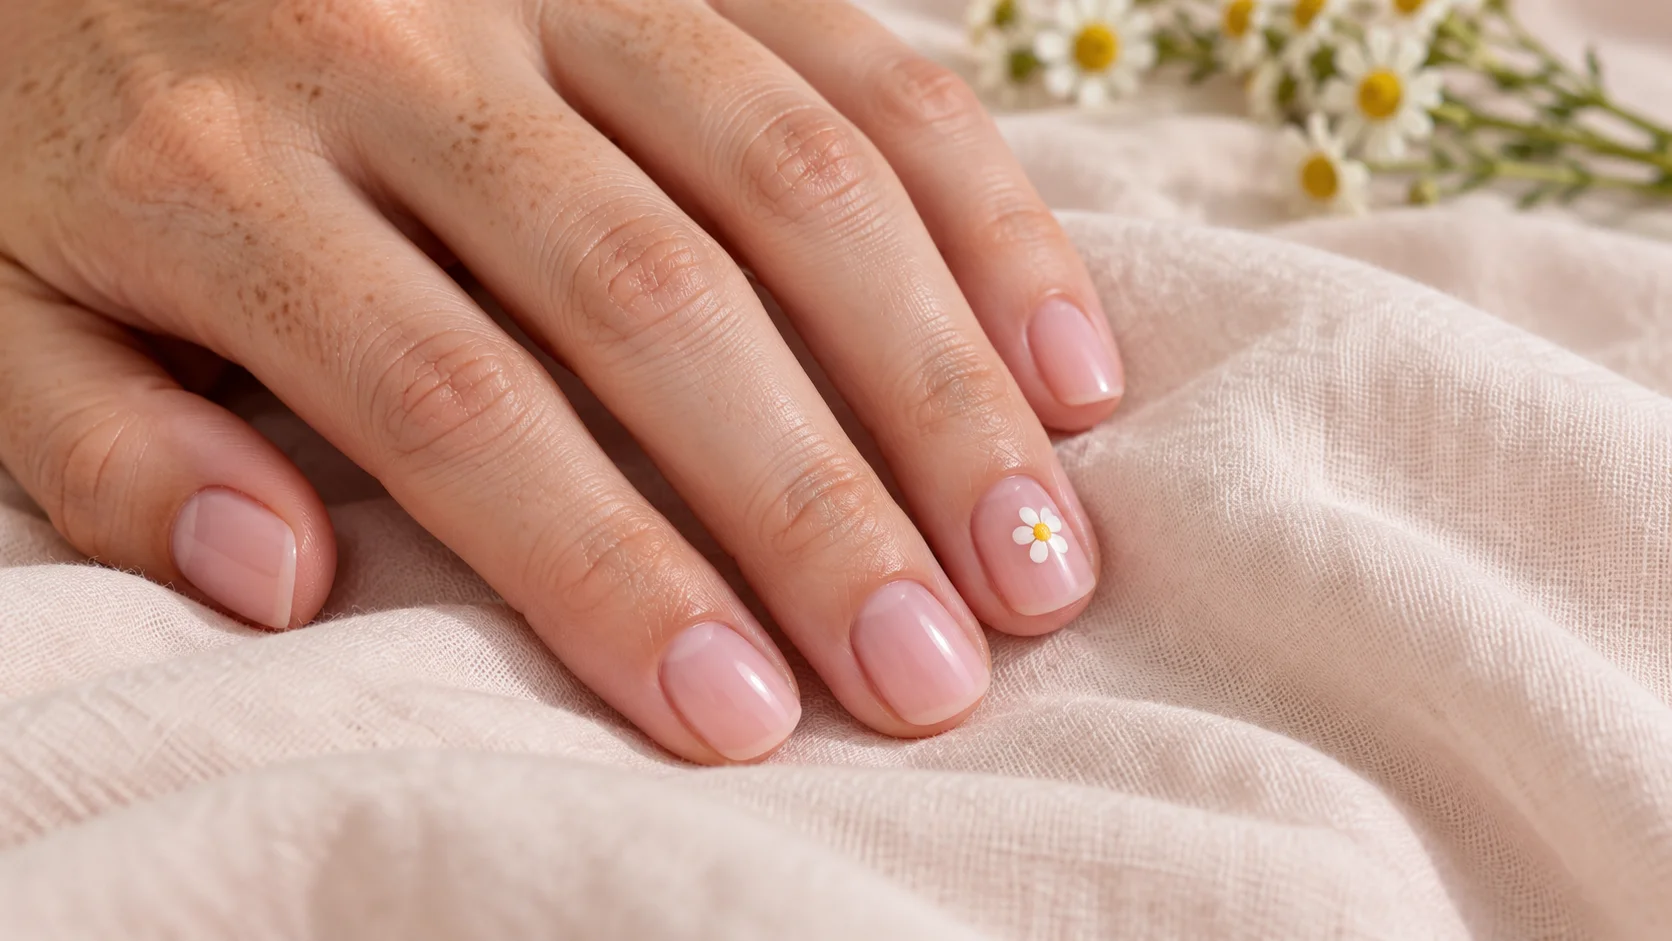
Begin with one accent and one motif. Decide whether the flower should sit near a corner, towards the centre or partly beyond an edge. Then choose how the other nails will support it. Our featured image is an AI-generated illustration of a small white daisy accent; it is a design reference, not a photographed salon result or a promise of what a particular product can achieve.
Choose a motif that survives being small
A flower does not need botanical detail to read as floral. A small group of rounded petals around a contrasting centre is a practical starting shape for a sketch. You can interpret it as a simple daisy-like mark without claiming to reproduce a particular species. Before choosing a tiny stem or leaf, check whether the flower alone already says what you want the design to say.
Essie’s UK floral nail art page places flowers among its manicure inspiration ideas. We use that page as design context rather than evidence that a particular look is currently popular. Your own version does not need to follow a season or a trend cycle: the important decision is how much floral detail you enjoy wearing.
Set the flower’s footprint
Draw a nail outline roughly matching the shape you plan to wear, then sketch the space the flower will occupy before adding individual petals. Compare a small central circle, an off-centre circle and a partial circle touching the edge. The empty area around each version is part of the composition. If the flower uses nearly the whole outline, it will give a different impression from a small accent with breathing room.
For shorter nails, simplify the motif before making every petal extremely tiny. A few clear rounded marks can be easier to recognise than many crowded ones. There is no mandatory petal count in this guide. Choose a shape you can repeat and judge it from the distance at which you normally see your hands, not only through a close-up camera view.
| Placement | Visual emphasis | Question to settle first |
|---|---|---|
| One centred flower | A clear focal point on an accent nail | Is the flower small enough to leave space around it? |
| Off-centre flower | A relaxed, slightly asymmetric detail | Which direction should it lean across the set? |
| Partial edge flower | A cropped motif entering from a side | Will enough of the centre and petals remain visible? |
| Two separated flowers | A more decorative accent | Can the flowers remain distinct without filling the nail? |
Keep the first palette small
Start with a base, a petal colour and a centre colour. A softly pink base with white petals and a small yellow centre is one possible arrangement. You could instead use an ivory base, berry petals and a pale centre. These are editorial colour suggestions, not precise shade recipes. Compare the actual colours together before deciding whether a fourth colour is useful.
The base’s coverage matters too. A sheer pink leaves some of the natural nail appearance visible, while an opaque pink creates a separate painted background. Essie’s Inside Scoop description provides one example of a product specifically labelled sheer pink. It is a vocabulary reference, not a tested recommendation or an exact match to the illustration. Check the product you intend to use rather than assuming all pale pinks behave alike.
Distinguish crisp petals from a wet, organic effect
Decide whether you want separate rounded petal marks or a softer, merging design. Those are different visual goals. Essie’s Pebbled Polka Dots tutorial deliberately places dots into a wet layer and welcomes organic shapes. That is useful context for why a wet-on-wet effect should not be mistaken for a universal method for producing crisp, separated petals.
For a distinct dotted flower, practise with the chosen ordinary-polish products and follow their application and drying directions. Test whether the marks keep their intended shape before attempting a full manicure. This guide does not specify a universal waiting time: products, layers and conditions differ. If you want an intentionally soft effect, make that a conscious part of the brief rather than trying to repair every blurred edge.
Practise the spacing, then the whole flower
On paper, mark the centre and place petal positions around it without filling them in. Check whether the spaces are large enough for the marks you intend to make. This can reveal a crowded layout before polish is involved. When moving to a practice tip, use a nail-art tool suitable for the selected product and test the size of one dot first.
Try one complete flower, then stop and assess it. A larger centre can hide too much of the petals; petals placed too close together can become one solid patch. If either happens, change the spacing or mark size on the next sample. Repeatedly adding paint to the same small flower can make it harder to identify which change would actually improve the design.
Build one readable floral accent
- Reserve the space. Choose the flower’s position and leave a quiet margin around it.
- Separate the marks. Plan the petals so their shapes remain visible beside the centre.
- Stop at the focal point. Add another flower or leaf only if the first one needs support.
Let the other nails support the accent
A floral accent can sit beside plain nails in the same base colour. That repetition gives the small motif a clear role without requiring extra artwork. If you want one more detail elsewhere, try a single dot in the flower’s centre colour rather than another complete motif. Compare the whole hand before deciding whether the second mark adds something useful.
Think about the two hands together. You might mirror the accent placement, repeat it on the same named finger or use one floral nail on each hand with a slightly different orientation. None is compulsory. A quick sketch prevents an accidental imbalance and gives a nail professional a straightforward map of what belongs where.
Adapt the reference to your skill and time
If painting a tiny flower is not the part of a manicure you enjoy, a salon service or a suitable ready-made nail-art product may be a better route to the appearance. Check the instructions for any sticker, decal or other decoration and whether it is intended for your chosen manicure system. A drawing of a flower does not establish how an accessory should be attached or finished.
A clear appointment brief could be: short softly squared nails, a sheer pink base, one small white daisy with a yellow centre on each ring finger, and plain colour elsewhere. Bring a reference for scale and specify whether raised decoration is part of the request. Our nail art and trends edit has more ways to keep a small design readable while making the amount of detail your own choice.
For the related design decisions, compare Tiny Polka Dot Nails: Spacing, Scale and Colour Ideas, Negative Space Nail Art That Works on Short Nails and How to Build a Nail Inspiration Board Your Technician Can Use. For the practical details, use Dotting Tools for Nail Art: Sizes and Simple Design Uses.
Common questions
How many flowers do I need for a minimal floral manicure?
One flower on an accent nail can carry the idea. Start there and assess the whole hand before adding another motif. The aim is not to reach a particular flower count, but to keep the detail readable and preserve the amount of open space you enjoy.
Can small floral art work on short nails?
Yes, if you adapt the motif to the available surface. Simplify the flower before trying to make many tiny petals fit. Sketch its footprint first, then compare the spacing at normal viewing distance so the design does not depend on a close-up photograph to be recognisable.
Does every flower need five petals?
No fixed petal count is required by this design guide. Choose a simple arrangement that reads clearly at the scale you intend to wear. The featured daisy-like illustration is a styling idea, not a botanical diagram or a template that every nail must reproduce exactly.
What colours should I start with?
Choose a base, a petal colour and a centre colour before adding anything else. Soft pink, white and yellow are one possible combination, while ivory and berry offer another direction. Compare actual samples and leave extra colours out until you can see what role they would serve.
Why did my painted petals merge together?
Check the mark size, spacing and whether the application method was intended to produce a wet, organic effect. Practise a new flower using your chosen products’ directions rather than repeatedly adding paint to the same one. This guide does not set a universal drying time for every polish.
Should the floral accent be centred?
It can be centred, placed slightly to one side or cropped at an edge. Sketch those versions before choosing, and make sure enough of the motif remains visible to read clearly. The position should be intentional across the set, especially if the two hands mirror each other.
Can I use a sticker or decal instead of painting a flower?
A suitable ready-made decoration may offer the appearance you want, but check its instructions and the manicure system it is designed for. A floral reference does not tell you how to attach or finish an accessory. Discuss the option with your nail professional if its compatibility is unclear.
How do I explain a minimal floral brief at a salon?
Specify the base coverage, flower colours, approximate size and which nails carry the accent. Say whether you want flat painted art or another kind of decoration. A simple finger map and one reference for scale make the request clearer than several photographs with conflicting amounts of detail.
Sources and further reading
- Essie UK — Spring nails and floral nail art — checked 2026-10-21
- Essie UK — Pebbled Polka Dots — checked 2026-10-21
- Essie — Inside Scoop — checked 2026-10-21